Thursday 26 May 2011

Make Your Own Homemade Compost: The Pit-less, Hassle-free Way

Three years ago, when I read about the Kambha in the newspaper, I got curious.  Here was a solution that promised to get rid of most of our garbage without any hassle. It seemed too good to be true. But like the high-frequency mosquito repellent gadget, which doesn’t even work for a day, was the Kambha another fraudulent device? Luckily, curiosity got the better of me. My husband and I went to meet the Kambha distributor at her home in Nungambakkam. What really convinced us in favour of the device was the distributor’s own Kambha. She was kind enough to let us right into her kitchen balcony and show us how her Kambha worked. We were amazed to find that despite holding bucket loads of garbage, it didn’t stink or attract any pests. 
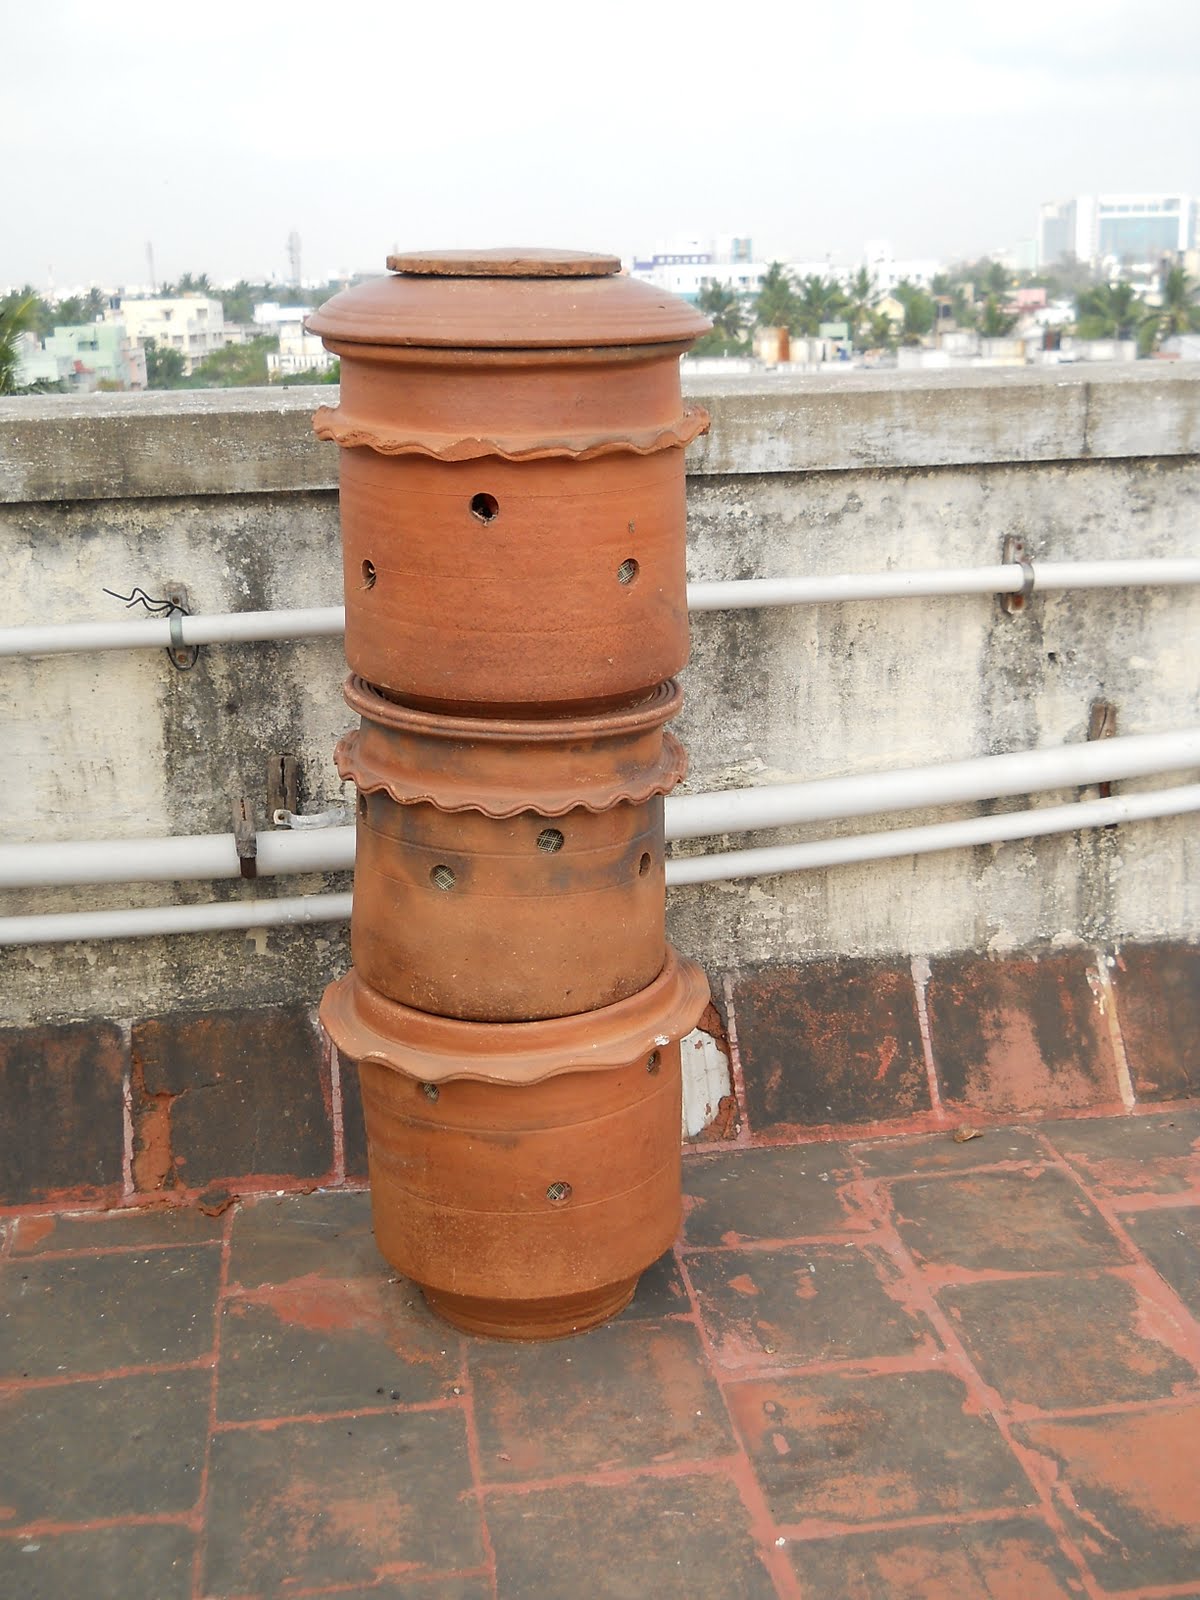
Kambha: For Pit-less Composting
Today, with 3 years of composting experience, I can vouch for the magic of  the Kambha. It's the easiest way to convert truck loads of kitchen and garden waste into precious  compost. We could complain about all the piles of stinky garbage lying around in the city or we could choose to use the Kambha. I assure you I haven’t been paid to write this post. I am endorsing it only because in all earnestness, I find it the neatest composter around.

The traditional way to composting is the compost pit. But the pit could attract rodents and other pests. You also need enough space for a pit.  The Kambha, on the other hand, requires very little space and is rodent-proof.  The fact that it has been designed by a designer of the internationally acclaimed National Institute of Design, shows in many ways. Seemingly simple, the design is  functional, sustainable, affordable and aesthetic, just as Poonam Bir Kasturi, the designer had envisaged.

The Kambha is a 3-tiered terracotta structure. You fill the top-most pot with wet kitchen waste and dry garden leaves and twigs. (If you don’t have a garden, just add shredded newspaper, sawdust or cardboard pieces.) Once 3/4th full, it is swapped with the middle unit.  After some time when the stuff in the middle unit has further reduced and partially composted, swap it  with the bottom-most unit, where it will mature further. Continue this cycle of filling and swapping for a few months, before you can harvest fully done compost. Doesn’t it sound simple? IT IS SIMPLE. All you need to do is spend a couple of minutes each day putting your waste in the Kambha. On weekends, you could devote a little more time, to make sure that nothing’s amiss.
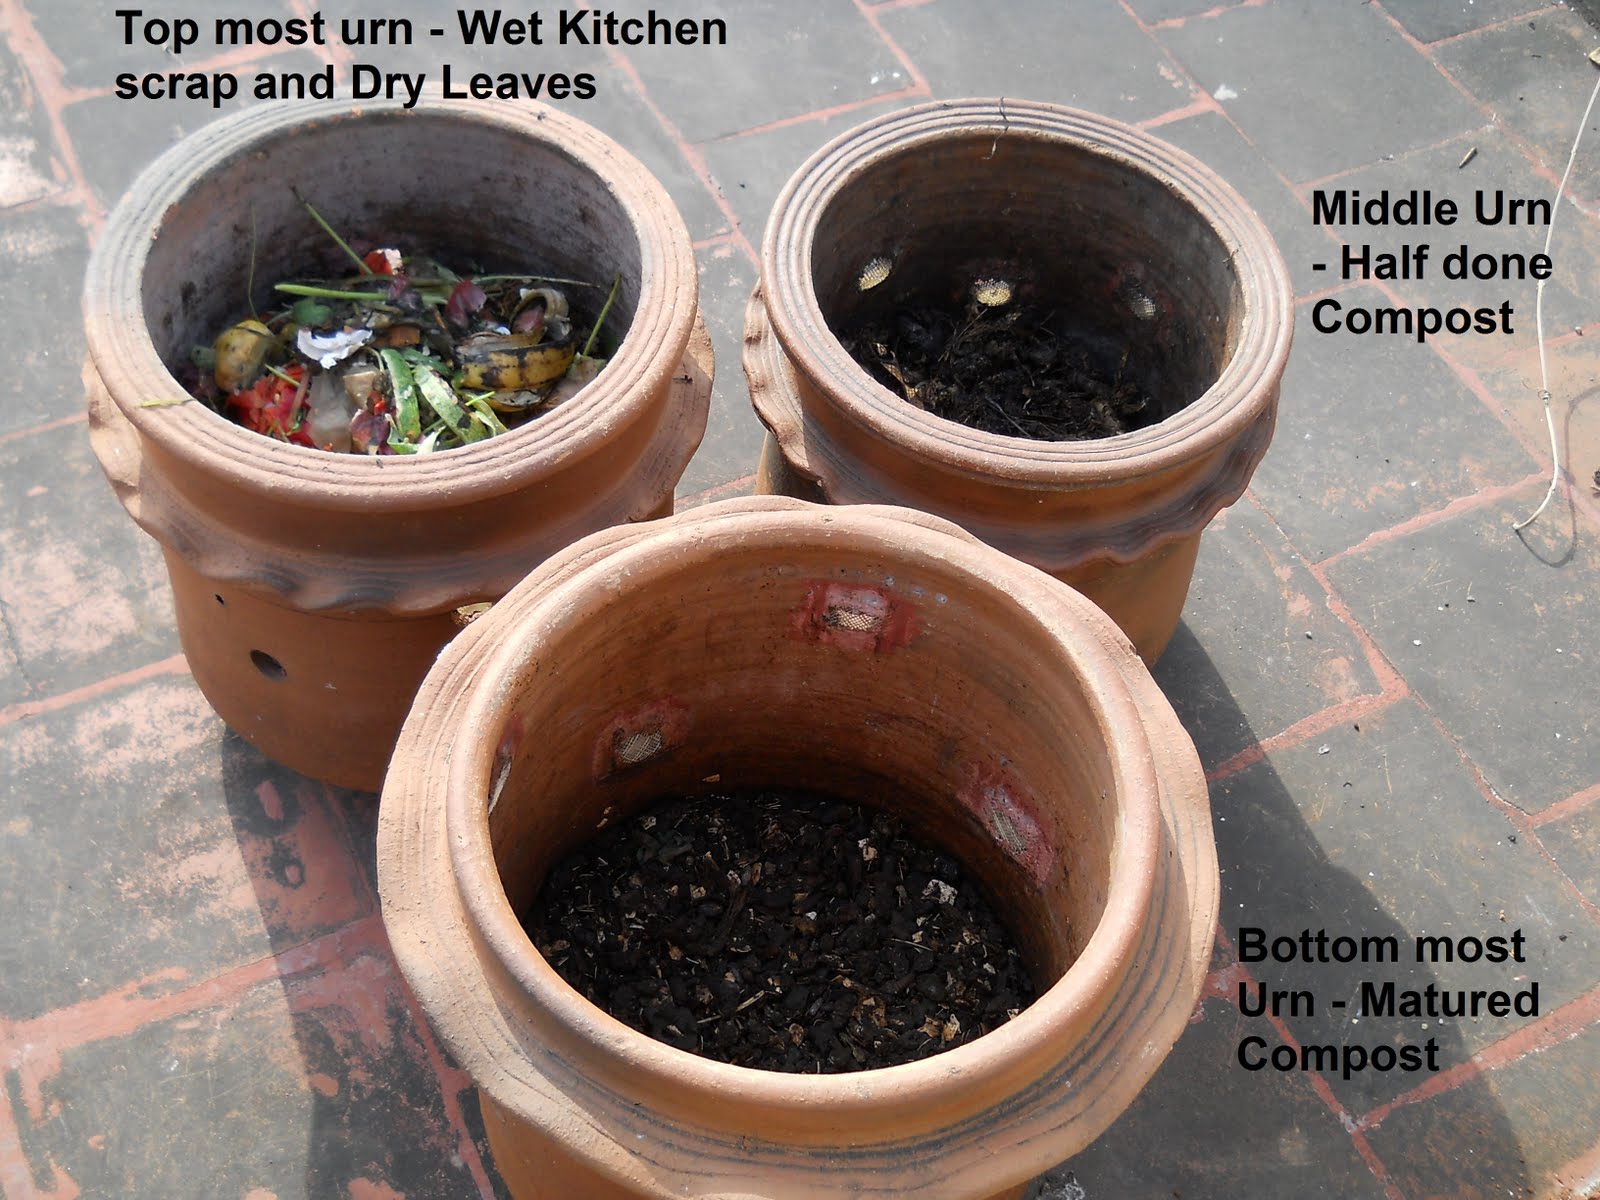
 What's Inside the Kambha
There are many myths to composting.
Composting is believed to be:
1.      Stinky and messy
2.      Time consuming
3.      Difficult
4.      Needing Space
5.      Attracting Rodents and Pests 

I can assure you that with the Kambha, composting is easy as A,B,C. I’ll leave it to the Daily Dump guys to convince you why the myths are all false. They’ve also a very good section on how to troubleshoot. You could run into trouble, if you don’t have the right mix of wet and dry stuff. The only trouble we ever had was in the Kambha’s first year, when we hardly added any dry garden waste. With only wet kitchen waste, the composter had more moisture than necessary and attracted some maggots. But the maggot infestation wasn’t troublesome and was easily dealt with. 

Final Sieved Compost: Fine as Tea dust
Armed with a little experience and plenty of fine compost, my husband recently convinced his colleagues to go in for a composter, the Manthan, to deal with all the canteen waste at his workplace.

Many of our urban garbage bins are such smelly eyesores. Composting is one easy, yet concrete way for each of us to actually contribute in cleaning up all the mess around us. I hope this post of mine will encourage you to begin composting.

Wednesday 25 May 2011

Summer Blooms

Chennai Summer is a mixed bag. It's when we have the humid heat sapping our energy and the power cuts that leave one grouchy. Yet in compensation, we have vacations, delicious summer fruits and summer blossoms.

The apartment complex where I live has a common garden that's teeming with shrubs and trees. Summer is when I get to see them all in bloom. Heralding the season is the Copper Pod Tree. This tree showers beautiful small golden flowers throughout the day, forming a lovely soft carpet for us to walk on. When this tree is done, the Gulmohur takes over. The flamboyant, flaming gulmohur flowers are a favourite with children. A dozen games -- which only a child's brain can conjure up -- can be played with this flower.


Copper Pod Tree
Gulmohur (Flame Tree)
 Apart from all the usual summer flowers, this summer, our garden earned a bonus. The Galangal, a special kind of ginger, offered to bloom. This was the first time in four years that it has flowered. Even the regular ginger flowers are a rarity. Ginger only flowers if you let it grow for a couple of years. So when the galangal blossoms appeared, it was indeed a kodak moment.
Galangal Flower
Galangal Plant - From the Ginger Family


Tuesday 10 May 2011

Coriander: From Seed To Seed

Here’s a little riddle -- White lace on a girl’s frilly green dress. What is it?
Answer: A coriander plant in full bloom.
Coriander or Dhania is a pretty, aromatic herb that is quintessential to Indian cuisine. When I was told that the plant is low maintenance, I decided I had to grow it. But there was a catch. Many people I knew, who had tried growing Coriander, had met with failure. They simply couldn’t get to start the plant from seed or had done so with great difficulty. A friend even told me that she believed that the store-bought seeds are probably boiled and so couldn’t be used. In fact she had sourced some seeds all the way from a US nursery, which were in contrast very easy to start. But where was I to get American seeds?
Coriander
When I tried growing coriander, I also had my share of teething troubles. I tried different ways: soaking the seeds, crushing them a bit, but all to no avail. Where was I going wrong? The answer to starting them, I learnt from my maid – who came from a farming family – was to crush the seeds really well before broadcasting them in the soil. In fact, she told me to use the grinding stone to crush the seeds. The idea is not to powder them fine but to properly divide a seed (actually the fruit) into two parts to expose the true inner seed. Once you know this, growing coriander is a breeze.

You'll be able to have a fresh coriander garnish whenever you please. After you are done with harvesting its leaves, the plant will start blooming; you’ll find your plant’s changed into that green frill dress with white lace. Soon, you’ll have seeds that are ready to be harvested. Pluck them and store them in a paper bag. A little toasting before use will bring out its heady aroma.
In Full Bloom

Pretty Coriander Flowers
Young, Green Coriander Seeds
Ready to Pluck

To The Plate
A few tips for the Newbie:
1.       Coriander loves the sun. Though delicate looking, the plant is rather hardy.
2.       To start the plant, dip into your spice jar and take out a tablespoon of coriander seeds. Crush them really well and broadcast them in the final place you want the coriander to grow; it doesn’t take well to transplanting.
3.       It takes a week or two for the seedlings to appear, so keep watering the seeds and you won’t be disheartened.
4.       The plant tends to go to seed very quickly. If you are keen to have more leaves, keep plucking them.
5.       Once the leaves become feathery, it’s a sign that the seeds are on its way.
6.       The seeds mature at different times. You will need to watch out for browned seeds; pick them every day, lest they burst and scatter.

The coriander is so dainty and fragrant, yet so easy to grow. Try it out if you haven’t already done so.

Monday 2 May 2011

Stirring Up A Hornet's Nest?

When I spotted this winged creature recently in our balcony, it evoked mixed reactions at home. My own reaction was one of apprehension; my little son could get stung and so it ought to be removed. On the other hand, my husband seemed overjoyed. Having tasted fresh veggies from our roof garden, he was now hoping for some fresh honey from the balcony.
Kathandu Forming its Nest
Construction in Progress
The Finished Nest
With honey as the enticement, both of us agreed that we must let the nest grow. The finished nest, however, didn’t resemble anything like the honeycomb we usually see. We also weren’t sure when and how badly we may get stung. We asked around and then turned to the Internet. But on this occasion, Google failed me; it’s million results were absolutely   baffling. I did learn many facts, like there are 100,000 wasp species and 20,000 bee species. But in the end, I still couldn’t determine who our visitor to the balcony was. So when we found the contact details of Mr. N. Swaminathan, a Chennai-based apiologist (one who studies bees), in The Hindu, I dashed off a mail to him. In The Hindu story featuring Mr. Swaminathan, he had claimed that bees can become very friendly and may even be domesticated like pets. So we were hopeful that he won’t tell us to bring down the nest. Yet when he replied, we were taken by surprise. The creature according to him was not a bee; it was a “Kathandu” in Tamil. He told me that its sting could be very “dangerous” and that I’d be wise to remove the nest. Now when an apiologist – one who can domesticate bees tells you that the kathandu is something not to be messed with, you’d imagine that we would take his advice seriously.

But the nest still remains in our balcony. We no longer dream of fresh honey, but we are yet to gather our wits and figure out how to be rid of the hive. So far its been: live and let live. One day, we shall act. You'll hear about the Eliminate Wasp Mission in another post.

My Lady’s (Sweet) Finger


For most gardeners, growing a solitary lady’s finger plant will not make much sense. Even if it’s prolific, a single plant cannot provide for a decent meal. Yet, if you’re like me, you’ll be happy just to see what it takes to grow lady’s fingers on a small scale. The plant is rather hardy and ideally suited for Chennai’s summer. ­­­At four feet, my plant is shorter than average, but it has yielded the sweetest lady’s fingers I’ve ever tasted. In fact they’re so sweet that they’re attracting ants. If it weren’t for the ants, I’d have had a couple of lady’s fingers every other day.
Lady's Finger Plant

Lady's Fingers: Two of Them
Ants on the Fruit Pods
The lady’s finger belongs to the Hibiscus family, which is why the flowers of both plants are very similar: large, showy with fused stamens in the centre. The flower bud of the lady’s finger is nearly indistinguishable from a young fruit pod. It’s only when a pod grows a little longer that I realize a fruit and not a flower is on its way.

Flower
Though I can’t make a meal of my produce, it still provides for a tasty snack, a snack that can be eaten fried or raw. I wouldn’t dare eat raw lady’s fingers bought at a shop. But when they’re freshly picked from home, they’re altogether different. After a blind taste test of a shop-bought one and a homegrown one, I discovered that the two were poles apart. For one, the homegrown one isn’t as slimy; it’s also markedly sweeter. I can’t blame the ants for wanting to devour the fruit.
My Finger and the Lady's Finger


For now, I need to figure out how to outsmart the ants and claim my rightful share.